

I’ve spent the last few months really getting into Home Assistant. Maybe too into it.
I’m at a point now where I think it’s safe to say I’m really quite good at setting up and optimizing random shiz in Home Assistant.
Its learning curve is as steep as ever, but ChatGPT has been a great tutor. Not having to pore over Home Assistant’s extreme levels of documentation and instead just asking a robot “How do I do this one specific thing?” has really leveled me up.
Some people use AI as a way of taking work away from themselves. Sometimes I do too. But it really shines when you’re open to learning and just let it teach you things.
The Problem to Solve
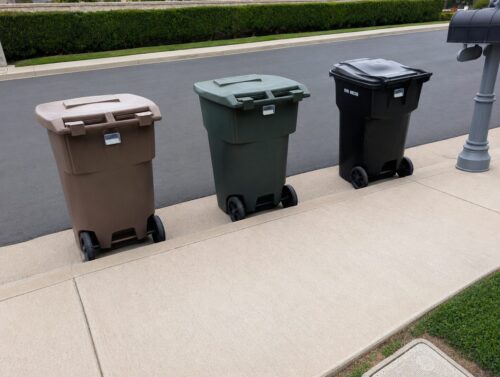
Every Friday I put three trash cans (garbage / recycle / yard waste) out on the curb for collection. They’re usually all collected within a few minutes of each other by three different trucks, but sometimes they run behind and hours can pass between pickups. I wanted to get notified when all three bins had been collected so I’d know when to take them in.
Nobody wants to walk outside on a rainy day just to find that the bins are still full of trash and you wasted a trip!
The Sensor
The first step was figuring out the hardware layer. Each bin would need some kind of sensor to know when it had been collected.
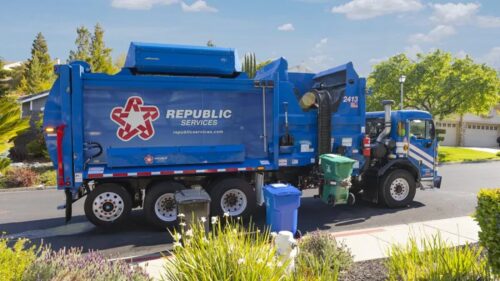
My garbage company uses those “one armed bandit” collection trucks. A robot arm grabs the bin, lifts it up over the hopper, and shakes it until all the trash comes out.
Smart tilt sensors are not only rare, but they’re very expensive. And I would need three of them. So I ruled those out pretty quickly.
I realized a simple open/close sensor would do the trick, so I went with Ikea’s mysteriously affordable Myggbett door/window sensors.
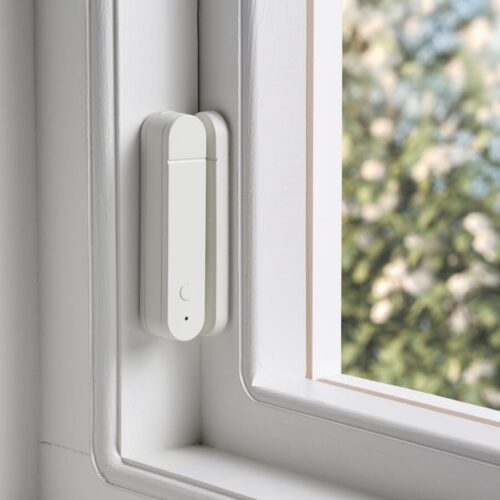
They’re simple $7.99 Matter over Thread devices. I already use one on my mailbox to tell me when the mail’s been delivered, so I know they’re reliable. I had planned to just stick them onto the trash bins and have them fire whenever the lids were opened. They were perfect. Or so I thought!
Even though they’re on a hinge, lids on garbage bins don’t line up very neatly. It was tough to find a sweet spot to mount them. I first mounted them on the inner lip of the bins to protect them from weather and that turned out to be a bad call.
Sometimes warm weather would loosen the tape on the sensors and they’d just fall off into the trash, lost forever. Sometimes the bin contents would knock the sensors lose as the bins were being emptied, and into the truck they went, never to be seen again.
Mounting sensors on the lids also came with another challenge – they would trigger any time I opened the bins, not just when a truck collected their contents.
Assembling a Flip Sensor
I was determined to use Ikea’s Myggbett sensors because their value to performance ratio is unbeatable.
After losing enough of them through mounting mishaps, I had learned two relatively inexpensive lessons: The included 3M sticky tape wasn’t strong enough for outdoor use, and mounting them anywhere inside the bin would only lead to loss, heartache, and repeated trips to Ikea for replacements.
I had to figure out a way to:
- Securely mount the Myggbetts to the outside of the bins
- Detect inverted bins, not lid openings
- Protect the sensors from rain
I searched Amazon for plastic enclosures that could house the Myggbetts and landed on these craft containers.
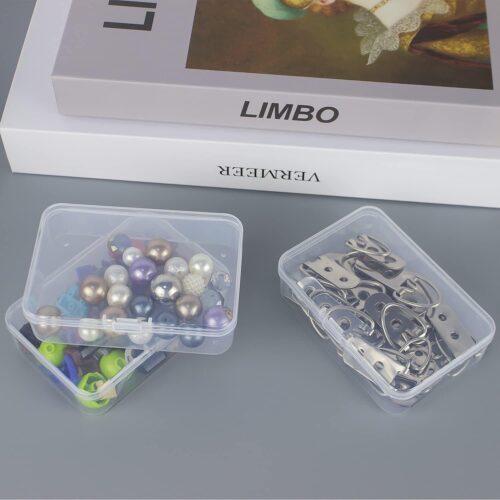
They’re polypropylene, not hard plastic, so they’re a little flexible and won’t crack if they get bumped. They come in different sizes, and the 3.5″ x 2.4″ x 0.9″ variant makes an ideal housing for Myggbett sensors. You can buy them here. (That’s an affiliate link.)
While they’re not officially waterproof, they do a decent enough job at keeping the water off of any sensitive parts of the sensors.
Outdoor Adhesive
I once watched an episode of Modern Marvels that introduced me to the wonders of 3M’s VHB tape, (“the strongest in the world,”) and that memory has stuck with me for nearly 20 years.
I mounted the plastic cases to each of my trash bins with VHB tape (mounted at an angle to prevent water from pooling on the tape,) and those things aren’t going anywhere. You can buy a roll of VHB tape at Amazon (affiliate link) and it will probably outlive you.
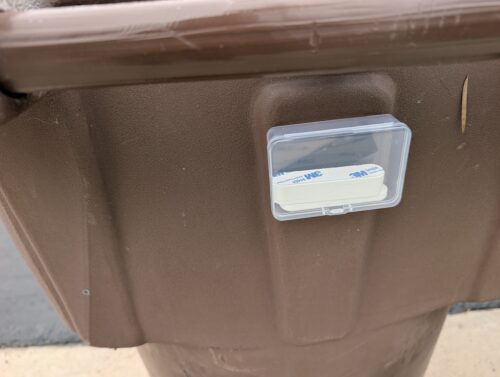
The top sensor (the part with the battery) rests on top of the slim half of the sensor, which is taped to the inside of the plastic box. When the bin is in the grip of a robot claw and flipped upside down, the two parts of the sensor separate, and Home Assistant registers an “open” event.
The practical hardware part of this project is complete. Now to tie it all in to Home Assistant.
Home Assistant
Step 1: Rename your bins after pairing
You’ve just paired your Myggbett sensors with Home Assistant. Now you’ve got to give them names to keep them straight.
Settings/Devices & Services/Matter
Call them Garbage Bin, Recycle Bin, and Yard Waste bin (or whatever).
Step 2: Create input boolean helpers
Now you’ll create three variables that will track and remember when each sensor’s state has changed. (We’ll reset these states daily.)
Settings/Devices & Services/Helpers/+ Create Helper/Toggle
Name: “Bin Status – Garbage Collected Today”
Icon: mdi:trash-can
Do the same for Recycle and Yard Waste bins.
Step 3: Create a template sensor helper
This is a single entity that will track the collection states of each of your bins. It’ll return an empty string when no bins have been collected, but will show each collected bin otherwise.
Settings/Devices & Services/Helpers/+ Create Helper/Template/Sensor
Name: Collected Bins
State:
{% set bins = [] %}

{% if is_state('input_boolean.garbage_collected_today', 'on') %}
  {% set bins = bins + ['🗑️  Trash'] %}
{% endif %}

{% if is_state('input_boolean.recycle_collected_today', 'on') %}
  {% set bins = bins + ['♻️  Recycle'] %}
{% endif %}

{% if is_state('input_boolean.yard_waste_collected_today', 'on') %}
  {% set bins = bins + ['🍂 Yard Waste'] %}
{% endif %}

{{ bins | join(' ') if bins | count > 0 else 'None' }}
Leave everything else blank and hit Save.
Step 4: Create collection detection automations
Here we’re just flipping the booleans for each bin as it gets collected.
Settings/Automations & Scenes/+ Create Automation/Create new automation/+ Add trigger/Device
Select your garbage bin (the Matter device) from the dropdown, and make the trigger “Garbage Bin Door Opened”
Click “+ Add action”, “Perform action”, and make the action “Turn on input boolean”.
Click to “+ Add target”, and make the target “Bin Status – Garbage Collected Today”
Save, call the automation “Garbage Bin Collection,” and create two more automations for the Recycle and Yard Waste bins.
Step 5: Create the “all bins collected” notifications
Settings/Automations & Scenes/+ Create Automation/Create new automation/+ Add trigger/Device
Click “+ Add trigger/State”.
Entity: Bin Status – Garbage Collected Today
To: On
Add two more triggers to this single automation for Recycle and Yard Waste.
Now when all three bins have been collected, it will trigger some notifications, whichever you choose to setup:
Send a pop-up alert to the Home Assistant Companion app on your phone
+ Add action/Notifications/Send a notification via “name of your mobile phone here”
Message: All three bins have been collected.
Title: Trash Collected
Pop-up a toast message on your LG TV
Not all TV manufacturers support this. LG does!
+ Add action/Notifications/Send a notification via “name of your LG TV here”
Message: All three trash bins have been collected.
Announce trash pickup over a Sonos speaker
(This assumes you’ve got a text-to-speech integration like Piper already set up.)
+ Add action/Text-to-Speech (TTS)/Speak/+ Add target/Piper
Media player entity: Select whatever speaker you want to play the announcement
Message: All three garbage bins have been collected. You can take them in now. Or better yet, get a child to do it.
I use the jenny_dioco voice. She’s Irish. It means more coming from her.
Step 6: Daily sensor reset
Let’s reset those booleans at midnight so the system is ready for the next collection day.
Settings/Automations & Scenes/+ Create Automation/Create new automation/+ Add trigger/Time and location/Time
At time: 12:00:00 AM
+ Add action/Perform action/Perform action
Action: Turn off input boolean
Target: Bin Status – Garbage Collected Today
Add two more targets here for the other two bins, and save.
Step 7: Add it to a dashboard
Finally. The plumbing’s all done, the notifications are set…now we just need a way to surface this data on the dashboard.
You can do it however you want, but I just placed a single Badge Entity on my dashboard:

Edit your dashboard and add a badge.
Entity: Collected Bins
Name (Custom): Bins collected today
Icon: mdi:trash-can
Name: on
State: on
Icon: off
To keep the dashboard clean, we only want to show this badge on days when trash is actually being collected. So we’ll just assume that if at least one bin has been flipped upside down, it’s trash day!
There are ways to determine trash pickup days and integrate with the Waste Collection Schedule integration, but it didn’t work very well with my trash company so I gave up on it.
Click the Visibility tab/+ Add condition/Entity state
Entity: Collected Bins
Attribute: leave blank
State is not equal to
State: Unknown
Save the badge, save your dashboard, and you’re done.
Wrapping Up
I’m well aware that nobody really needs this level of automation in their life. People have been putting trash bins out on curbs and taking them back in for decades.
I did it because it was a fun project. And thanks to my secure backup system, I’m feeling pretty good about things, secure in the knowledge that I will never ever have to touch this again for as long as I live.